

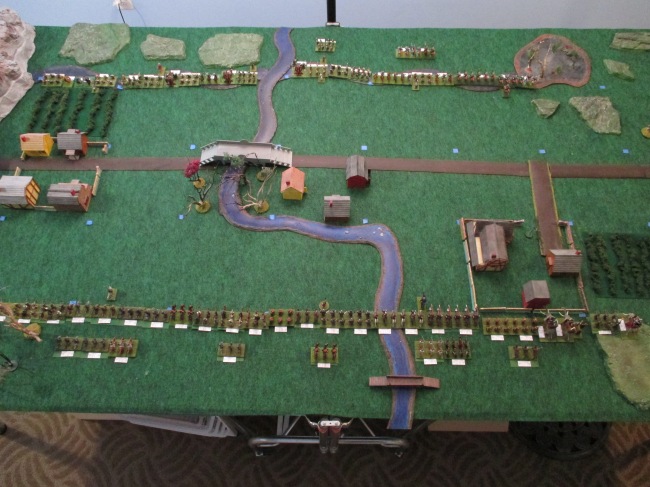
This was the deployment of the Dwarves and Men of the South and East for the Play Test.
Play testing a miniatures scenario can be a pain. It’s not all that much fun to work out problems with a game system or scenario on your own, without at least one other interested person to bounce issues and ideas off of. Plus it’s virtually impossible to think just like somebody else, but that is what you have to try and do when designing a game, i.e., consider all of the possibilities and potential strategic decisions (and annoyances) that other players may have in playing your game.
Also, if you are having a bunch of friends come over, you don’t want to have critical flaws in your game system, or scenario specific rules, ruin their time. So, given the crappy weather and 3 day weekend, I decided to run a game using my newly painted Dwarven Army and some other newly painted figures, and see if there were any fatal flaws or improvements I could make in my scenario specific rules, before the guys would come over for the actual game. I am glad I did!
The first challenge I faced was making an even scenario, where both sides would have a roughly even chance of winning. In order to do this with the various units I was interested in using, most importantly my new Model Dwarven Army (see previous blog), I needed a points system. The game system we are playing is a very fast and simple 4 page rules system, and there was no point system included in it. So I made up a points system, that I believe accurately accounts for a unit’s statistics in obtaining a point total, measuring each side’s combat effectiveness. But as any miniatures war gamer knows; based on the particulars of any given scenario, that point system may not lead to a fair game. My points system assumes that other variables, such as the balance between light and heavy infantry and cavalry units is somewhat equal as are the units’ morale values. If these are out of whack, or if there is a particular terrain layout that favors one side or the other, the game can be very one sided even if the points are roughly equal.
For this system, I used the following to approximate even sides (and had some fun with Excel):
(1+ORDER/6) * ATTACK * (6/(6-ARMOR) * (HEALTH/6)
I incorporated these Logical Modifiers into the above:
– IF Heavy Units have a MORALE of 4 or more, their value is increase by an additional 20%
– Heavy Cav and Artillery are further increased by an additional 50%
– Light Cav is further increased in value by 100%
– Giant Creature Units are further increased by an additional 50%
– Large Creature Units are further increased by an additional 25%
Giant and Large Creatures are extra powerful because they not only have lots of hit points and generally very good armor, but because they are so strong that they reduce the effectiveness of their opponents armor protection.
 In the case of cavalry and artillery, they get special movement rules and shooting rules that other units don’t have, so I took a guess at increasing their point values based on the mechanics of this particular game system (Ares Exultant). But again, that advantage could be lost if they are operating in poor terrain for that type of unit.

I was able to get through 5 turns playing solitaire, which is a pretty good effort and enough of a play test to come up with the necessary improvements in my mind. What follows is a picture or two of each turn, and a description of events…
Turn 1: the Evil Southrons and their Easterling allies immediately take the village on their right. This was an obvious move. Units in towns have significantly improved defense, but the order of heavy troops is reduced, that is not a bad trade off and well worth it, even though with my initial rules, there were no victory points awarded for taking a town. I moved some heavy infantry in, even with the loss of order. All the other units just advanced as well.


Turn 2: The Southron force continues to advance on their left, but held fast on their right after taking the town. They did not want to lose that all important defensive bonus of being in a walled town, which I thought would outweigh any advantage in performing an advance across the entire line. Plus the loss of order would be maintained until the unit could reform outside of the town, and when facing Dwarven artillery and enemy cavalry it did not seem prudent to push on the right. The Dwarves and their Badger allies also decided to stay put and see what would happen on the opposite flank.


Turn 3: The Southrons continue to attack on their left flank, with their warg riders headed for the weak Dwarven right flank and their heavy infantry and Mumakil advancing just to the Warg’s center. And with this advance come the first chance for Aruman to release fiery death on the opposing Dwarven Heavy Infantry. He hits with maximum effect and the Dwarves fail to save any order or lives in the hellish blast. The usually stalwart Dwarves are forced to retreat with their ballista in tow. This would open up the battlefield for an effective attack, if it weren’t for the Gray Wizards equally effective use of a Web of Despair, to entrap the Mumakil unit in front of the Dwarven line. The Mumakil is trapped for 2 maneuver phases which, when coupled with some weaker units in that same area could spell doom for the Haradrim’s battle plan.


Turn 4: With one giant Mumakil trapped for a couple turns, the remaining troops continue the charge into the Dwarven lines, however, the Dwarves are not stupid, and advance the very powerful (Asgard miniatures) Swamp Giants, who were obviously bought off by a promise of Dwarven Gold, one normally does not come by in the swamp. The Dwarven artillery decides to stick around and shoot at the Haradrim light infantry, and gets the best of it. All down the line, the Dwarves kick butt and the evil dudes are not having a good day, after that initial luck with the fire ball.


Turn 5: I had pretty much learned my lessons from this play test after only 5 turns. Looking at the master plan of the Southrons, it involved flanking out the Dwarves using their speedy Warg Riders on their left flank, however, the woods and stream protecting that flank meant that a single unit of heavy Dwarven Infantry could take on a whole group of enemy heavies due to the increased armor protection afforded by the river, Even with the Variag trolls, which would reduce the armor effectiveness by a pip due to their great strength, the defensive terrain would get the Dwarves that pip back, and with a swamp to their rear, there was no effective way to flank the Dwarves. And since they were kicking Aruman’s ass in the middle, it was time to head south. The Badgers smelled blood and advanced on the Dwarven left. I would have to rethink this or the bad dudes would face yet another humiliating loss (the baddies always seem to lose in my games and I am trying my best not to bias these scenarios).

Lessons Learned – Based on my play testing, I learned a few things and made a few changes to my initial scenario:
1) Don’t just line your guys up and attack the enemy, it’s much more interesting to have varied victory conditions. Maybe that’s an obvious statement, but I thought both sides would just slug it out without any special victory conditions. I imagine they would if both sides were all comprised of fierce Barbarian types… http://www.youtube.com/watch?v=Oo9buo9Mtos
So instead of just awarding victory points for enemies KIA or routed based on their point values, if you add in terrain objectives that make logical sense in your scenario, that helps to get things going and adds more strategic thinking and complexity. In my case, I added points for slaying enemy leaders, as well as for killing enemy units and holding the towns at the end of the game.
2) Initial set up is really important. Just as in a DBx game, it’s not easy to maneuver around the battlefield in this system, so for the actual game, I am instituting a double blind set up with both sides having access to the table layout, but no idea of how their opponents will set up. Neither side has enough good units to plan on taking all three towns, so there is a lot of strategy and guess work in how an objective will be taken while making sure your army is not outflanked and destroyed.
This is revised map layout and deployment that I came up with based on the play test. This is much more even than what I had, in so far as the Dwarves do not have an automatically protected flank and there are 3 towns to go for, although neither side has adequate troops to go for all three and hold them, the Haradrim and Easterlings have more units and this should make for an interesting dilemma for the Dwarven side, trapped in the horns of a strategic dilemma.
This is a revised map and potential set up. In this example, the Dwarves have pretty much given up on taking the town on their left, but should capture the one on their right and can battle for the one in the center without getting their army outflanked and surrounded (maybe). In any case, I think its a much more even set up.
3) Morale ratings are more important than I thought in this system, since there are significant casualties dealt out automatically on routing units. Therefore, I increased the morale of some of the lesser values troops so they have at least some decent chance of not running at first contact and getting destroyed all at once by initial melee casualties and then by the automatic casualties caused by opposing (more mobile) troops attacking you in a route. Morale is a very difficult characteristic to put an accurate point value on, because what you suffer by having a low morale differs greatly based on what type of troops you are facing and how much room you have to retreat.
4) “Magic” can be very effective in my scenario. Like a lot of players, I did not want to go crazy on the magic rules and have a lucky or well-placed spell change the outcome of the game. But I did find out that the players had better be prepared to use it effectively and to counter its impacts, because they don’t, a lucky spell CAN really change the outcome of a critical melee. And the outcome of a critical melee can then change the outcome of the whole game. Even so, I decided to stay with the rules I play tested. We’ll see how adept the players are at using these pretty effective magic rules to their advantage. Both sides have the same ability of magic using leader, with the same spells so at least it’s fair for both sides, even if some will think that my magic rules have too much of a
game impact.
5) Keep it simple. Since Area Exultant were written primarily for Ancients, and were meant to be a very simple and fast moving game, I really did not want to ruin it with a lot of extraneous rules. However, I did want this version to have a fantasy feel, and that meant the addition of more rules, unfortunately. So I added rules for Personal Combat, Magic, Giant and Large Creatures, and a random table for encounters when entering a town. You have to liven things up when playing with Dwarves, Giants, Trolls and Mumakil. Even so, make your scenario rules fit to the existing rules as much as possible.
Now I just need some beer and pretzels…
